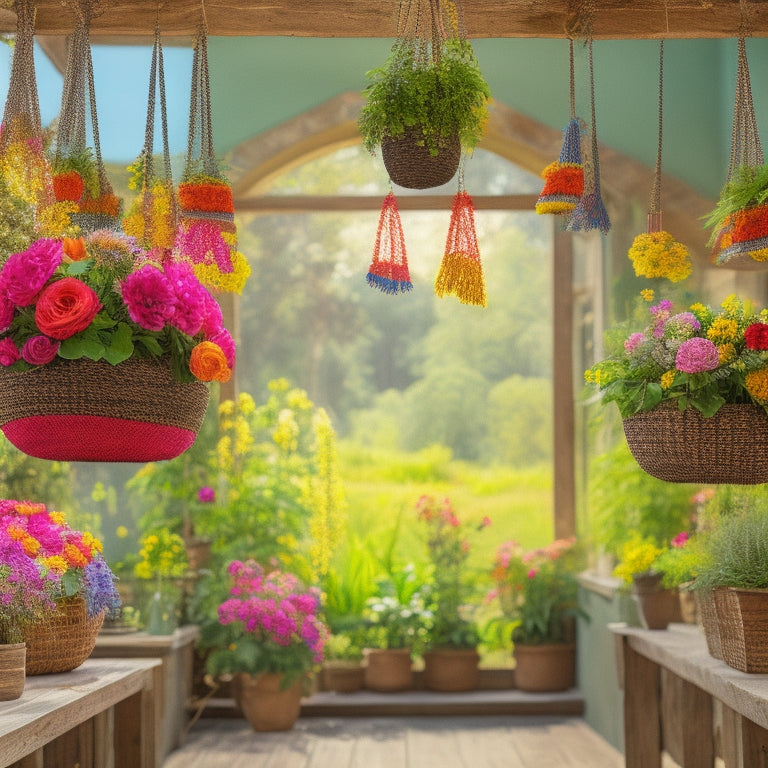
DIY Hanging Baskets: Stitch, Store, Admire
To craft a DIY hanging basket, precision is key. Begin by cutting four fat quarters of fabric into rectangles and tab strips, selecting thread that complements your fabric choice. Assemble the hanging tabs with a 1/2-inch seam allowance, then attach them to the exterior piece securely. Construct the basket exterior with fused fabric pieces, sewing sides together with a 1/2-inch seam allowance, and boxing corners for structure. Finally, finish the storage basket interior with a complementing fabric, ironing and pinning for a wrinkle-free finish. With attention to detail, you'll be able to admire your handiwork and store your belongings with ease, and discover more clever ways to customize your design.
Key Takeaways
• Cut four fat quarters of fabric into rectangles and tab strips, considering storage needs and fabric durability.
• Assemble hanging tabs by sewing, turning, and topstitching strips, then attaching them securely to the exterior piece.
• Attach chalkboard labels to each basket, positioning them for visibility and securing them with adhesive and decorative stitching.
• Construct the basket exterior by cutting, fusing, and sewing fabric pieces together, boxing corners for structure and precision.
• Finish the interior by choosing complementary fabric, ironing and pinning for a smooth finish, and adding pockets or dividers for organization.
Cutting Fabric and Preparing Pieces
Four fat quarters of fabric are required to create the DIY hanging baskets. You will cut a total of four rectangles measuring 13 x 21 inches, along with eight tab strips measuring 3 x 7 inches.
When selecting fabric, consider storage needs and choose materials that can withstand weight and frequent use. For a cohesive look, choose a thread that complements the fabric selection.
Proper fabric preparation is essential. Cut corners from the rectangles to ensure smooth seams and prevent bulkiness. Additionally, cut a strip of chalkboard fabric for labeling purposes.
Assembling the Hanging Tabs
With the fabric pieces prepared, attention turns to assembling the hanging tabs, an essential component that enables the baskets to be suspended from a rod.
The tab strips, cut from the fat quarter, are sewn together with a 1/2 seam allowance, then turned right side out and topstitched. Next, they are attached to the exterior piece, ensuring a secure hold for the hanging hardware.
Fabric selection and color coordination play a vital role in this step, as the tabs should complement the overall aesthetic of the basket.
The hanging hardware installation process requires careful consideration, ensuring a sturdy connection that can support the weight of the basket and its contents.
Attaching Chalkboard Labels
Each hanging basket requires a single chalkboard label, carefully positioned to provide a convenient writing surface for identifying the contents of the storage basket.
When attaching the label, consider label placement to guarantee excellent visibility. Center the label 1 inch away from the edge, then secure it using spray basting adhesive or a glue stick. Reinforce the label with a bean stitch to prevent it from peeling off. For added flair, incorporate decorative stitching around the label's perimeter.
To guarantee label security, carefully select an adhesive option that will not compromise the label's integrity. By following these steps, you can create a functional and aesthetically pleasing label that complements your DIY hanging basket.
Constructing the Basket Exterior
Cutting and fusing the exterior fabric pieces sets the stage for constructing the basket exterior, where precision and attention to detail are essential.
With the fabric selection and preparation complete, it's time to assemble the basket. Begin by sewing the sides of the exterior piece together, ensuring a precise 1/2-inch seam allowance.
Next, box the corners of the basket to create a sturdy structure. The hanging tab, carefully attached earlier, will now be secured in place as you sew the top edge of the basket.
Finishing the Storage Basket Interior
The interior of the storage basket demands meticulous attention to detail to guarantee a smooth, finished surface that complements the exterior's sturdy structure. To achieve this, focus on the following key elements:
-
Fabric selection: Choose a fabric that complements the exterior fabric and provides a cohesive look.
-
Lining installation: Maintain a smooth, wrinkle-free lining by ironing and pinning it in place before sewing.
-
Seam finishing: Use a serger or zigzag stitch to prevent fraying and create a professional finish.
- Interior organization: Consider adding pockets or dividers to optimize storage organization and make the most of the hanging basket's space.
Frequently Asked Questions
Can I Use Regular Fleece Instead of Fusible Fleece?
The eternal conundrum: can one substitute regular fleece for its fusible counterpart? Alas, the answer lies in the benefits of fusible fleece, which provides stability and ease of use, making it an ideal choice; alternatives may compromise the project's integrity.
How Do I Prevent Fraying on the Cut Fabric Edges?
To prevent fraying on cut fabric edges, consider applying fabric sealants or edge binders, which create a barrier to prevent fibers from unraveling, ensuring a clean finish and extending the lifespan of your fabric projects.
Can I Use a Different Shape Instead of a Rectangle?
Like a canvas awaiting brushstrokes, fabric shapes can be reimagined. Yes, you can deviate from rectangles; explore circle alternatives or hexagon inspirations, ensuring accurate cutting and adjustments to sewing patterns to maintain the basket's structural integrity.
How Do I Hang the Baskets on a Rod Without Them Sagging?
To prevent sagging, strategically position the rod to distribute the weight of the baskets evenly, ensuring the rod is sturdy and securely fastened, and consider adding support brackets or adjusting the basket weight by reducing contents.
Can I Make the Baskets in Different Sizes?
Yes, custom sizes are achievable by adjusting fabric cuts and fusible fleece dimensions. This allows for a basket variety, enabling creators to craft unique storage solutions tailored to specific spaces and organizational needs.
Related Posts
-
Vintage-Style Freestanding Bathroom Cabinets for Classic Look
When you choose vintage-style freestanding bathroom cabinets, you're adding timeless charm to your space while maximi...
-

Craft Your Own Hanging Organizer With Ease
To craft a functional and stylish hanging organizer, begin by gathering essential materials, including natural cotton...
-
Revamp Your Cleaning Business With This Checklist
Revamping your cleaning business requires a strategic overhaul of operational inefficiencies, starting with the imple...


