Easy Guide to Crocheting Granny Squares for Beginners
Unlocking the Magic of Crocheting Granny Squares: A Beginner's Journey
Welcome, fellow crochet enthusiasts, to a portal of creativity and coziness – the world of crafting beautiful granny squares! As someone who has been weaving threads into intricate patterns for years, I am thrilled to guide you through the basics of crocheting these timeless treasures.
What are Granny Squares and Why Crochet Them?
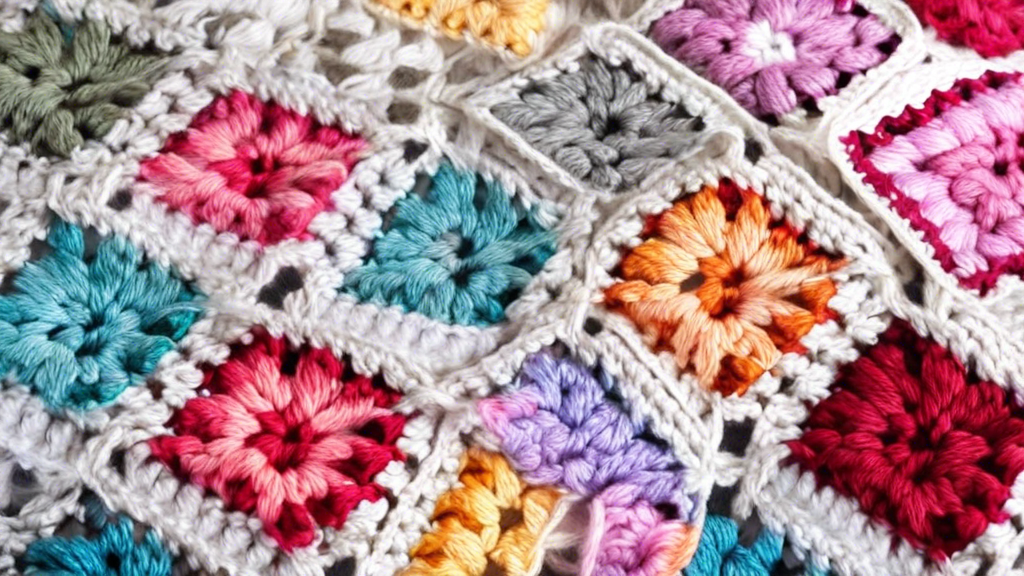
If you're new to the crochet scene, you might be wondering: What exactly are granny squares? Simply put, they are small, square-shaped crocheted pieces that are then joined together to create larger projects, like blankets, scarves, and even garments. The beauty of granny squares lies in their versatility and endless design possibilities.
Now, you might ask, why should you try your hand at crocheting granny squares?
- Beginner-Friendly: Granny squares are perfect for those who are new to crocheting or looking to sharpen their skills. The basic stitches and repetitive nature of granny squares make them an excellent starting point for beginners.
- Portable Projects: One of the great things about granny squares is that you can work on them anywhere – during your daily commute, while watching TV, or even at the park. All you need is a ball of yarn and a crochet hook!
- Creative Outlet: Crocheting granny squares allows you to experiment with different colors, yarn weights, and textures, giving you the freedom to express your unique style and creativity.
Getting Started: Tools of the Trade
Before diving into your crocheting adventure, you'll need to gather a few essential tools:
- Yarn: Choose your favorite yarn in various colors to bring your granny squares to life. Worsted weight yarn is often recommended for beginners.
- Crochet Hook: Opt for a hook size that complements your yarn choice. A size G/4mm hook is a good starting point for beginners.
- Scissors: A sharp pair of scissors will come in handy for cutting yarn between color changes or at the end of your project.
Creating Your First Granny Square
Now, let's dive into the fun part – crocheting your first granny square! Follow these simple steps to get started:
- Make a Slip Knot: Begin by making a slip knot and placing it on your crochet hook.
- Chain Stitch: Create a foundation chain by crocheting a certain number of chain stitches, depending on the size of the square you want to make.
- Forming the Center: Work a series of stitches into a center ring to form the starting center of your square.
- Building the Corners: Continue crocheting rounds, increasing at the corners to create a square shape.
- Joining: Once your square reaches the desired size, fasten off your yarn and weave in the ends. Your first granny square is complete!
With practice and patience, you'll soon be whipping up granny squares like a pro, ready to explore more complex patterns and projects.
Embrace the Granny Square Journey
As you embark on your crocheting journey, remember that each stitch tells a story of dedication and creativity. Take your time, savor the process, and don't be afraid to experiment with new colors and techniques.
Whether you're creating a vibrant blanket for a loved one or a cozy scarf for yourself, granny squares are a timeless craft that transcends generations. So pick up your crochet hook, choose your favorite yarn, and let the magic of crocheting granny squares unfold before you.
Related Posts
-
Modular Bathroom Storage for Small Spaces
Modular bathroom storage is your go-to solution for small spaces, turning clutter into chic organization. Use wall-mo...
-

Stylish Glass Door Storage Solutions
Stylish glass door storage solutions transform your spaces into stunning showcases. These sleek designs maximize spac...
-
Revamp Your Bathroom Drawers With Custom Organizer
I'm revamping my cluttered bathroom drawers with a custom organizer that's both functional and visually appealing. I ...


